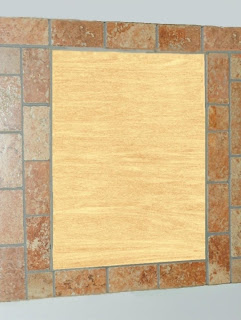
DIY: New frame for old picture
Hello everyone ! Today I want to share with you another DIY project, that I finished not a long time ago, this time it is going to be something new, not fashion related. Six years ago our friend from Lithuania gave us a beautiful picture, it is "painted" with Baltic amber. It was framed in a golden, heavy, museum look frame. It is a beautiful frame, but it did not go with the style our house is decorated, and I think it overpowered the picture. That is why I decided to change the frame, and make something that would complement this beautiful amber painting.
Привет всем ! Сегодня я хочу поделиться с вами еще одним проектом, который я закончила не так давно, на этот раз это будет что-то новое, не связанное с модой. Шесть лет назад наш друг из Литвы подарил нам прекрасную картину, украшенную балтийским янтарем. Она была оформлена в золотой, довольно тяжелой, музейного вида раме. Мне она очень нравится, но она не совсем подходила к стилю в котором оформлен наш дом, и еще мне кажется что она забивала картину. Вот почему я и решила изменить рамку и сделать что-то, что будет дополнять эту красивое произведение из янтаря.
 |
| Old frame |
 |
| New frame |
Materials I used:
Square size plywood, measured to the size I needed:
Материалы которые я использовала в этом проекте:
Фанера квадратной формы, толщиной около 2 см
Фанера квадратной формы, толщиной около 2 см
Ceramic tile caulk (any brand), mosaic tile adhesive, ceramic tile (red brick), rope and natural stone jewelry from arts and crafts store:
Герметик для керамической плитки (любой марки), клей для мозаики, керамическая плитка (цвет красного кирпича), веревка и украшение из натурального камня купленного в магазине декоративно прикладного искусства:
Герметик для керамической плитки (любой марки), клей для мозаики, керамическая плитка (цвет красного кирпича), веревка и украшение из натурального камня купленного в магазине декоративно прикладного искусства:
Step1:
I glued ceramic tile using the mosaic tile adhesive, then filled the gaps between each tile with tile caulk, giving 24 hours for adhesive and caulk to dry and set,so it looked like that:
Я приклеила керамическую плитку на фанеру с помощью клея для мозаики, затем заполнила промежутки между плиткой герметиком, и оставила на сутки высыхать:
Step 2:
I glued on a picture in the center, put some heavy weight on it, and left it overnight. The next day I glued the outer border of the amber picture with the rope and filled the narrow gap between the inner border of the tiles and outer border of the picture with natural stone jewelry from arts and crafts store, the size was exactly matching the size of the gap. I used the same tile adhesive for both rope and jewelry application.
Затем я приклеила янтарную картинку в центр, прижала тяжелым весом,и оставила ее на ночь. На следующий день я проклеила внешнюю границу янтарной картинки веревкой и заполнили узкую щель проходящую между плиткой и картиной бусами из натурального камня, размер подошел точно. Картинку, а также бусы и веревку я обклеила тем же клеем - для плитки.
Step 3:
I glued the perimeter (outer border) of the plywood with the rope to deepen the rustic and natural style of the amber and red brick tiles.
Внешнюю границу фанеры я тоже обклеила веревкой.
Have a great weekend everyone, stay cool !


Новый вариант действительно хорошо вписался в интерьер вашего дома и подчеркнул само произведение.Молодец!
ReplyDeleteМила
You did a wonderful job! And what a stunning picture! x
ReplyDeleteThank you Little Rus ;o)
ReplyDeleteThank you for visiting my blog :-) You are incredibly creative, your final version is so different from the original, I admire people so much who have that creative vision! What a great DIY.
ReplyDeletewww.styleonthecouch.com
Very cool!! The new frame goes really well with the woodsy feel of the picture!
ReplyDeletelooks awesome!! really cool blog!
ReplyDeletewant to follow each other?
xxo!
i love how it turned out! you are so talented!
ReplyDeletexoxo,
Fashion Fractions
great job! thanks for such a detailed list of instructions :) have a great weekend
ReplyDeleteMadebygirl.blogspot.com
MadeByGirl.com
Thank you Jen, have a fabulous weekend ! ;o)
ReplyDeleteLove this project!
ReplyDelete